
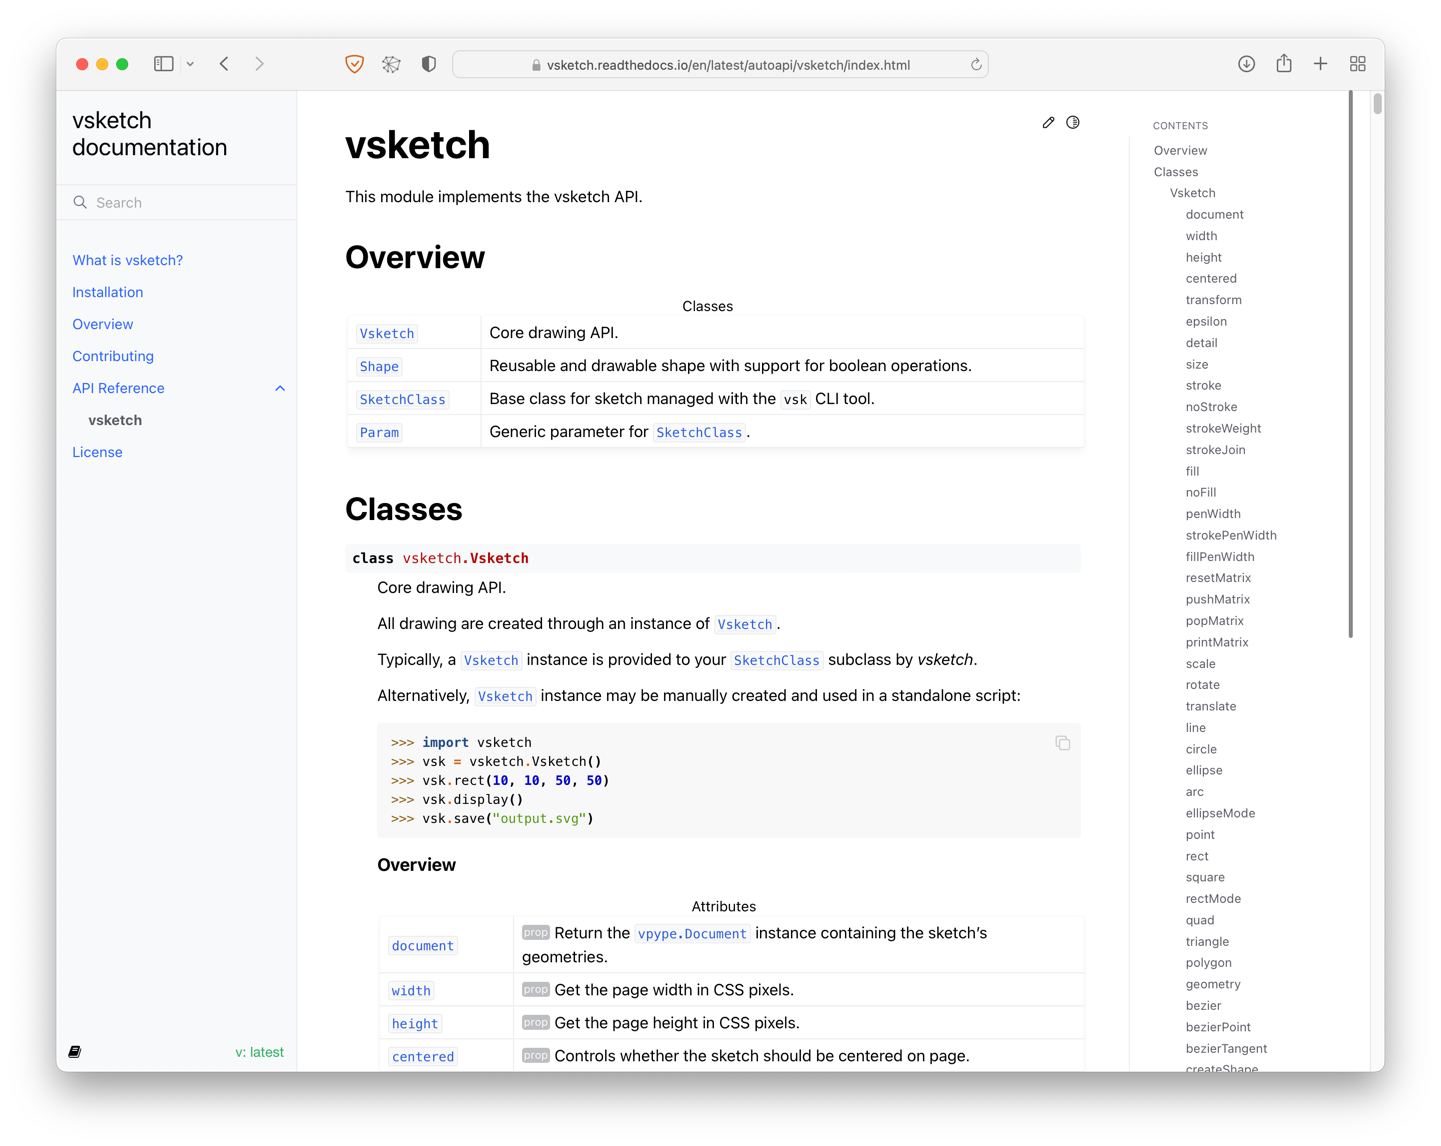
Following a recent discussion on Twitter, I decided to take yet another deep dive in my Python projects' documentation and fix once and for all the issues I had with it. I first focused on the automatically-generated API reference section and this article details the results of my finding. Specifically, I’m using vsketch’s API reference, which I recently updated, as an example (documentation source.
This article addresses the following objectives:
- Produce a beautiful API documentation based on the code docstrings that is both nice to look at and easy to navigate.
- Support for a proper table of content navigation down to each class/module’s member.
- Nice looking summary tables listing modules' and classes' contents.
This article targets an audience of FOSS maintainers who are unhappy with the state of their project’s API documentation, and are frustrated with the process of improving it. A basic understanding of Sphinx as well as an existing documentation setup is assumed. This article basically contains everything I wish I was told when I first started on my API reference improvement journey. For the beginners, I’ll provide pointers to help setting up a basic Sphinx.
Note that although this article is structured as a tutorial, it covers tips and techniques which are likely useful for other kinds of documentation customisation.
Basic setup
As stated above, the basic steps to setup a Sphinx-based documentation project are outside the scope of the present article. I suggest reviewing the following resources to get started:
- @Mariatta made a brilliant tutorial on how to kick-start a Sphinx documentation project.
- Thomas Cokelaer has a very nice reStructuredText cheat sheet.
- Simon Willison wrote another cheat sheet which covers “the subset of reStructuredText worth committing to memory”.
- Obviously, Sphinx’s documentation is an important resource. Although it is somewhat arid for the newcomer, I strongly suggest not giving up on it. I had multiple “oh there it is!” moments with it in the process of writing this article.
- Finally, Read the Docs is likely the best place to host your documentation. It’s very simple to setup and free for open source projects.
As for the theme, my preference goes for Pradyun Gedam’s Furo. I’m using it with the default configuration, so the only requirement is to enable it in your conf.py file:
html_theme = "furo"
Note that some of the CSS provided in this article may need adjustments should you opt for a different theme.
Autoapi setup
After trying both autodoc/autosummary and Sphinx AutoAPI, I opted to use the latter. Here are the main reasons behind this choice:
- Autosummary does not generate TOC entries for API elements such as classes/modules and their members. This is due to a long-standing Sphinx limitation. Autoapi works around this limitation (albeit imperfectly, as we’ll later note).
- Autosummary defaults to not generating anything and is in my experience frustrating to setup. In contrast, autoapi produces usable output out-of-the-box.
- Templates are easier to write thanks to the rich “mapper” objects AutoAPI provides after parsing your code (see the AutoAPI objects section below).
Note that there are two things called “autoapi” floating on the Internet: the Sphinx AutoAPI project (documentation) is the good one. The other one is unmaintained and barely documented. Make sure you don’t loose time dealing with the wrong one.
Basics
Setting up Sphinx AutoAPI is covered in their documentation. It boils down to the following steps.
- Install the
sphinx-autoapipackage:$ pip install sphinx-autoapi - Add AutoAPI it to the Sphinx extension list:
extensions = [ ..., 'autoapi.extension', ] - List your package directories (or the directory containing them) and set basic options:
autoapi_dirs = ['../mypackage'] autoapi_type = "python" - Add the generated documentation to your
index.rsttoctree:.. toctree:: :maxdepth: 3 ... autoapi/index
Setting up templates
We will customise Sphinx AutoAPI’s default templates. The easiest is to copy Sphinx AutoAPI’s default templates in your project to serve as a starting point.
First, run the following commands (adjusting for your Python version) from your documentation directory:
$ mkdir _templates
$ mkdir _template/autoapi
$ cp $VIRTUAL_ENV/lib/python3.10/site-packages/autoapi/templates/index.rst _templates/autoapi/
$ cp -r $VIRTUAL_ENV/lib/python3.10/site-packages/autoapi/templates/python _templates/autoapi/
Then, tell Sphinx AutoAPI of its template directory in your conf.py file:
autoapi_template_dir = "_templates/autoapi"
A useful tip is to make a Git commit just after copying the built-in templates, such that you can track (and revert) your modifications. I’ve used this extensively while working on my templates.
At this point, I suggest spending some time to become acquainted with the built-in templates and how they are organised and implemented. If you haven’t used it before, it is also useful to review the Jinja2 templating language documentation.
Other configuration options
autoapi_options
The autoapi_options controls various aspect of the generated documentation, including the type of class/module members that are listed. Its default value is sensible but I still felt like customising it:
autoapi_options = [
    "members",
    "undoc-members",
    "show-inheritance",
    "show-module-summary",
    "imported-members",
]
In particular, I want the summary at the top of the module’s documentation (show-module-summary), but we will heavily customise it. Check the documentation for a list of available options and their descriptions.
autoapi_keep_files
Another useful option is autoapi_keep_files. Sphinx-autoapi generates .rst pages for the documentation during the build process, but defaults to deleting them after completion. It’s often useful to keep them around for inspection and debugging purposes:
autoapi_keep_files = True
autodoc_typehints
This is technically an autodoc setting, but Sphinx AutoAPI honours it. It controls if/where type hints are included in the documentation. The possible values are the following:
"signature": type hints are included in the function signature, which appears first in the member’s documentation"description": type hints are included within the function description, when the arguments are listed"both": type hints are included in both places"none": type hints are not included
My preference goes for "signature":
autodoc_typehints = "signature"
AutoAPI objects
Understanding the Sphinx AutoAPI objects is key to customising templates. They are one of the major difference with respect to autodoc/autosummary.
In order to generate the API documentation, the autodoc loads your actual code and uses Python’s introspection capabilities to extract the required information from your module and class objects. In contrast, Sphinx AutoAPI parses your Python code and builds a collection of so-called “mapper” objects which describe your code and its structure. These objects are then passed on as context to the Jinja2 templating engine. Oddly, the documentation doesn’t provide a reference about them, but their implementation is easy to read.
Here is a summary of some of the attributes that are useful when writing templates:
obj.name- Name of the mapped object, e.g.
"MyClass"or"my_method". obj.id- Fully qualified name of the object, used for cross-referencing, e.g.
"my_module.MyClass"or"my_module.MyClass.my_method". obj.summary- Summary of the object’s docstring (i.e. the first line).
obj.docstring- Full docstring of the object.
obj.display- Indicates whether or not this object should be displayed, based on the options set in
conf.pyand the result of theautoapi-skip-memberevent (discussed later). obj.children- (Modules and classes only) List children functions, methods, attributes, etc.
obj.properties- (Functions and methods only) List of properties, such as
"classmethod","staticmethod"","abstractmethod","property", etc. obj.obj.args- (Functions and methods only) List of 4-tuples describing the function’s arguments. The first item is the star operator if any (
"*","**", orNone), the second is the argument name, the third is the argument type orNone, and the fourth is the argument default value orNone. This key piece of data will enable us to recreate the signatures according to our needs.
When working on your documentation, it is often useful to inspect the contents of these mapper objects using a debugger. This can be achieved by adding an handler for the autoapi-skip-member event and setting a conditional breakpoint:
def skip_member(app, what, name, obj, skip, options):
    # conditional breakpoint here
    return skip


def setup(sphinx):
    sphinx.connect("autoapi-skip-member", skip_member)
This event will be triggered for every single Python object parsed from your code. By breaking, for example, when obj.name == "my_module", the obj argument and its children can be fully inspected. I use the following run configuration in my IDE for this:
- Execute module:
sphinx.cmd.build - Parameters:
-M html . _build - Working directory:
docs/
An autosummary-like macro
By default, Sphinx AutoAPI provides a summary list of classes, functions, and attributes at the top of a module’s documentation, which is very nice. Our objective is to add a similar table at the top of each class description, to facilitate navigation. However, Sphinx AutoAPI uses its own autoapisummary directive, which derives from autosummary’s autosummary directive. Both suffer from the following limitations:
- The way callables are rendered is hard-coded and cannot be customised via templates. In particular, if
autodoc_typehintsis set to"signature"or"both",autosummarywill include type hints in the summary table as well. Unfortunately, this dramatically increases the length of the signature, which is detrimental to the table layout and usability. Alternatively, signatures can be entirely removed by using the:nosignatures:option. However, in this case, not even parenthesis are displayed, which hides the callable nature of the function. The best compromise is to have the full signature with their arguments, but without typing annotations. - Properties are listed as functions, including their signature. This hides the fact that, API-wise, they behave as data members (though it would still be useful to indicate that they are in fact properties).
- There is not indication that a method is abstract, static, or class-based.
To address these shortcomings, we will create a Jinja2 template macro to replicate and improve on autosummary/autoapisummary functionality.1
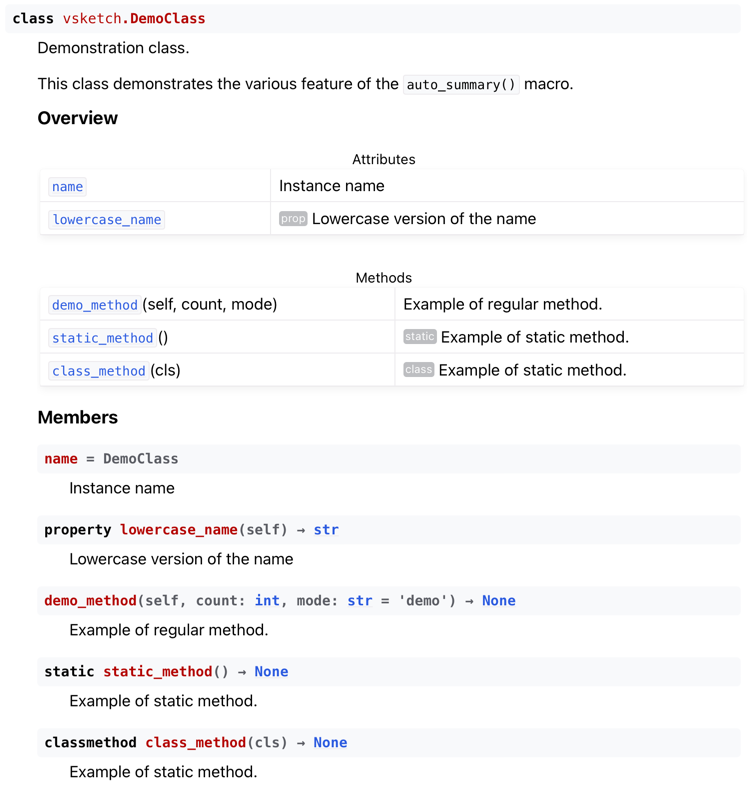
Our aim is to create tables where callable have their full – but unannotated – signature, where properties are indicated as such but rendered as attributes, and where static, class, and abstract methods are marked as such. Here is an example of this:
Basic macro setup
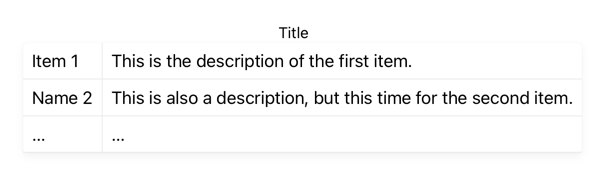
The basic insight is that a summary table can be implemented using Sphinx’s list-table:
.. list-table:: Title
   :header-rows: 0
   :widths: auto

   * - Item 1
     - This is the description of the first item.
   * - Name 2
     - This is also a description, but this time for the second item.
   * - ...
     - ...
Such a table can be generated with the following Jinja macro:
{% macro auto_summary(objs, title='') -%}

.. list-table:: {{ title }}
   :header-rows: 0
   :widths: auto

{% for obj in objs %}
    * - obj.name
      - obj.summary
{% endfor %}
{% endmacro %}
To test this, create a file named _templates/autoapi/macros.rst and add the code above. Then, make the following edits to the _templates/autoapi/python/module.rst file:
- At the top of the file, import
macros.rstto make it available for use:{% import 'macros.rst' as macros %} - Locate where the class summary is generated:
.. autoapisummary:: {% for klass in visible_classes %} {{ klass.id }} {% endfor %} - Replace the code above by a call to our macro:
{{ macros.auto_summary(visible_classes, title="Classes") }}
Here is the result I obtain with my project:

This is a good start, but we’re obviously far from the result we want. To start with, no cross-reference links are generated. And, had we passed functions or methods instead of classes to our macro, no signature would have been generated.
Custom labels
Before fixing our macro, we must discuss these nice looking “prop”, “static”, and “class” tag-like labels in the example tables above. These are implemented using a custom role with some CSS attached to it.
This StackOverflow answer explains how to create a custom role and make it globally available to your documentation. Basically, just add the following to your conf.py file:
rst_prolog = """
.. role:: summarylabel
"""
The role directive creates a new role which can then be used as follows:
:summarylabel:`My Label`
Sphinx generates the corresponding HTML code:
<span class="summarylabel">My label</span>
Since it sets an HTML class named after the role, it’s easy to adjust the label appearance using some custom CSS. Create a file named _static/css/custom.css in your documentation directory and add the following CSS:
span.summarylabel {
    background-color: var(--color-foreground-secondary);
    color: var(--color-background-secondary);
    font-size: 70%;
    padding-left: 2px;
    padding-right: 2px;
    border-radius: 3px;
    vertical-align: 15%;
    padding-bottom: 2px;
    filter: opacity(40%);
}
Note the use of CSS variables in order to support Furo’s dynamic night mode feature.
Finally, we must tell Sphinx about this CSS file in the conf.py file:
html_css_files = [
    "css/custom.css",
]
Customising the table appearance
A similar CSS approach can be used to customise the appearance of the summary table itself. By adding the :class: option to the list-table directive, we can tell Sphinx to attach an HTML class to the <table> element, which we can then customise with CSS:
.. list-table:: Title
   :header-rows: 0
   :widths: auto
   :class: summarytable

   * - ...
     - ...
For my project, the only change I made to the default appearance is to force the table to span the entire width regardless of its contents. This can be done by adding the following code to our custom.css file:
table.summarytable {
    width: 100%;
}
Putting it all together
We are now ready to put everything together and improve our auto_summary() macro to our liking. Here is the final code for macros.rst:
{% macro _render_item_name(obj, sig=False) -%}
:py:obj:`{{ obj.name }} <{{ obj.id }}>`
     {%- if sig -%}
       \ (
       {%- for arg in obj.obj.args -%}
          {%- if arg[0] %}{{ arg[0]|replace('*', '\*') }}{% endif -%}{{  arg[1] -}}
          {%- if not loop.last  %}, {% endif -%}
       {%- endfor -%}
       ){%- endif -%}
{%- endmacro %}

{% macro _item(obj, sig=False, label='') %}
   * - {{ _render_item_name(obj, sig) }}
     - {% if label %}:summarylabel:`{{ label }}` {% endif %}{% if obj.summary %}{{ obj.summary }}{% else %}\-{% endif +%}
{% endmacro %}

{% macro auto_summary(objs, title='') -%}
.. list-table:: {{ title }}
   :header-rows: 0
   :widths: auto
   :class: summarytable

  {% for obj in objs -%}
    {%- set sig = (obj.type in ['method', 'function'] and not 'property' in obj.properties) -%}

    {%- if 'property' in obj.properties -%}
      {%- set label = 'prop' -%}
    {%- elif 'classmethod' in obj.properties -%}
      {%- set label = 'class' -%}
    {%- elif 'abstractmethod' in obj.properties -%}
      {%- set label = 'abc' -%}
    {%- elif 'staticmethod' in obj.properties -%}
      {%- set label = 'static' -%}
    {%- else -%}
      {%- set label = '' -%}
    {%- endif -%}

    {{- _item(obj, sig=sig, label=label) -}}
  {%- endfor -%}

{% endmacro %}
The work is now split in three macros:
auto_summary()- This is the “public” macro. It generates a table based on a list of mapper objects, with an optional title. It iterates over the list of objects, and, for each of them, determines if the signature should be generated (functions and non-property methods) and if some label should be attached. It then uses
_item()to generate each object’s code. _item()- This helper macro generates the code for each object, prepending a label to the summary if requested.
_render_item_name()- This helper macro focuses on generating the properly-cross-referenced object name. If the signature is requested, it iterates over the
obj.obj.argslist to produce a full (but unannotated) list of arguments.
Improving the default templates
With our auto_summary() macro completed, we are now ready to customise our templates, but we still have one issue to resolve before we do so.
Categorising objects with a custom Jinja2 test
As we saw in the AutoAPI objects section, mapper objects representing modules or classes have a children attribute which lists the objects it contains. For example, a module’s children attribute lists all the classes, functions and attributes defined within it.
In order to categorise these children into separate sub-lists, the built-in templates heavily use the selectattr() and rejectattr() filters. For example, a list of classes in a module can be obtained as follows:
{% set visible_children =
    module_object.children|selectattr("display")|rejectattr("imported")|list %}
{% set visible_classes =
    visible_children|selectattr("type", "equalto", "class")|list %}
This code selects the visible (but not imported) children from module_object, and then further selects children which have their type set to "class". In the code above, "equalto" is known as a Jinja test. There are many such built-in tests in Jinja2.
As stated before, we aim to categorise properties as attributes instead of methods. To that end, we will have to filter methods whose properties attribute contains "property". Intuition dictates that the following code achieves this:
{% set property_methods =
    all_methods|selectattr("properties", "contains", "property")|list %}
The bad news is that no such "contains" test exists by default in Jinja2. The good news is that it is trivial to add one.
First, the actual test must be written. Add the following code to your conf.py file:
def contains(seq, item):
    return item in seq
Then, we just need to add this test to the Jinja environment. Sphinx AutoAPI provides a hook for that:
def prepare_jinja_env(jinja_env) -> None:
    jinja_env.tests["contains"] = contains

autoapi_prepare_jinja_env = prepare_jinja_env
With this in your conf.py file, the template code above will work as expected.
Updating templates
We previously replaced one of module.rst’s use of autoapisummary by our auto_summary() macro (see Basic macro setup). It is now time to generalise the use of our macro. At this stage, the details of how this is done is to a large extent up to reader’s taste. The templates of vsketch can serve as fully-functional example and can readily be used in another projects.
For the module.rst template, I have opted to simplify the overview’s structure by just generating tables (without headings) for classes, functions, and attributes:
{% if "show-module-summary" in autoapi_options and (visible_classes or visible_functions) %}
{% block classes scoped %}
{% if visible_classes %}
{{ macros.auto_summary(visible_classes, title="Classes") }}
{% endif %}
{% endblock %}

{% block functions scoped %}
{% if visible_functions %}
{{ macros.auto_summary(visible_functions, title="Functions") }}
{% endif %}
{% endblock %}

{% block attributes scoped %}
{% if visible_attributes %}
{{ macros.auto_summary(visible_attributes, title="Attributes") }}
{% endif %}
{% endblock %}
{% endif %}
For the class.rst template, I chose to rework the structure of the documentation into two rubrics:
   {% if visible_methods or visible_attributes %}
   .. rubric:: Overview

   {% set summary_methods = visible_methods|rejectattr("properties", "contains", "property")|list %}
   {% set summary_attributes = visible_attributes + visible_methods|selectattr("properties", "contains", "property")|list %}

   {% if summary_attributes %}
   {{ macros.auto_summary(summary_attributes, title="Attributes")|indent(3) }}
   {% endif %}

   {% if summary_methods %}
   {{ macros.auto_summary(summary_methods, title="Methods")|indent(3) }}
   {% endif %}

   .. rubric:: Members

   {% for attribute in visible_attributes %}
   {{ attribute.render()|indent(3) }}
   {% endfor %}
   {% for method in visible_methods %}
   {{ method.render()|indent(3) }}
   {% endfor %}
   {% endif %}
Note the use of the custom "contains" Jinja2 test we implemented earlier.
Hiding submodules
Sphinx AutoAPI include all subpackages and submodules recursively, unless those are marked as private by prefixing their name with an underscore. In my packages' __init__.py file, I carefully import from submodules the objects which are meant to be public, but haven’t necessarily marked the submodules as private. Sphinx AutoAPI has no option to control whether or not to add them (I suggested adding one), so I had to filter them out manually. This is done with the autoapi-skip-member event handler we mentioned earlier:
def skip_member(app, what, name, obj, skip, options):
    # skip submodules
    if what == "module":
        skip = True
    return skip

def setup(sphinx):
    sphinx.connect("autoapi-skip-member", skip_member)
Hiding members
Likewise, it may happen that you want to hide specific members from the documentation without marking them as private. Again, the autoapi-skip-member event handler can do that. The following example is based from actual code in vsketch:
def skip_member(app, what, name, obj, skip, options):
    if "vsketch.SketchClass" in name:
        if obj.name in [
            "vsk",
            "param_set",
            "execute_draw",
            "ensure_finalized",
            "execute",
            "get_params",
            "set_param_set",
        ]:
            skip = True
    return skip
Note that name is the fully qualified name of the object, so the vsk member has name set to vsketch.SketchClass.vsk. In contrast, obj.name is just the base name.
Also, for this to work as expected for modules, I had to change the following line in module.rst
{% set visible_children = obj.children|selectattr("short_name", "in", obj.all)|list %}
into
{% set visible_children = obj.children|selectattr("display")|selectattr("short_name", "in", obj.all)|list %}
Without this modification, objects marked as skipped would show up in the summary tables.
Ordering
By default, Sphinx AutoAPI generates the documentation in the same order as the code. This can be changed to alphabetical order, I like being in control from the code.
In vsketch, the top level content is determined by the imports in my package’s __init__.py file, so the import statements themself matter. Since I’m using isort, I had to short-circuit it in this particular case:
# vsketch/__init__.py

# isort: skip_file

# Ordered for the documentation
from .vsketch import Vsketch
from .shape import Shape
from .sketch_class import SketchClass, Param, ParamType

from .easing import EASING_FUNCTIONS
from .utils import working_directory
Conclusion
Well, this ended up being much longer than anticipated 😅 – if you made it this far, congratulations! 🎉
Here is what we covered:
- We built on a basic Sphinx project and added AutoAPI to generate an API reference documentation.
- We created custom templates based on the built-in templates provided by AutoAPI.
- We reviewed the mapper objects created by AutoAPI to described our code.
- We learned how to use a debugger to easily inspect these objects.
- We crafted an
autosummary-like macro namedauto_summary()to build beautiful summary tables. - We customised these tables with custom CSS.
- We used a custom Sphinx role and CSS to create tag-like labels to be used in the summary tables.
- We learned of Jinja2’s tests and created a custom one.
- We controlled the visibility of submodules and members using a
autoapi-skip-memberevent handler. - We learned how to control ordering from our code.
Like any software project, improving the documentation is a never-ending endeavour. As it turns out, there is one remaining issue that has been bugging me and is yet unresolved. Due to a limitation in Sphinx, AutoAPI has a tendency to mangle the TOC ordering, especially when section headings are emitted from the templates. Check these two issues for more information. Hopefully they’ll get solved in the future.
I shall conclude by stating that, by all means, I do not consider myself a Sphinx expert — much to the contrary. I did spend a lot of time improving my API documentation, and figured it would be wasteful not to share my findings, especially given the relative scarcity of information on advanced Sphinx usage patterns. As a result, it is rather likely that I made mistakes and sub-optimal choices. If so, please do provide feedback, and I’ll update this article to improve it.
Edit: updated title and intro to clarify the nature of the API discussed, i.e. Python API (2022-05-11).
-
Ideally, these shortcomings would be addressed using an extension and a custom directive, or even by contributing the improvement back to the Sphinx or AutoAPI projects. This is sadly beyond my skills. Also, the template method is anyway useful for highly specific requirements where writing an extension wouldn’t be warranted. ↩︎