vpype 1.9 is finally out! 🎉
I recently stumbled upon a post by Simon Willison where he promotes the idea of annotated release notes. As it turns out, this release is, by any metric I can think of, the biggest and most transformative so far. The associated change log is consequently rather unwieldy and calls, you guessed it 💡, for the present annotated release notes.
(Note: although the original release notes are extensively quoted in this article, I reshuffled and shortened the original material. Make sure to check the base material for an authoritative list of change.)
Properties
Basics
Added support for global and per-layer properties (#359)
This feature introduces metadata to the pipeline in the form of properties which may either be attached to specific layers (layer property) or all of them (global property). Properties are identified by a name and may be of arbitrary type (e.g. integer, floating point, color, etc.). A number of system properties with a specific name (prefixed with
vp_) and type are introduced to support some of the new features.
Metadata is data which says something about other data, and vpype lacked such a thing. Until now, what was passed from one command to the next consisted exclusively of paths sorted into layers, without any context such as what the color of these paths might be. One command could “know” about something (e.g. read knows, from the SVG, the color of a layer), but it could not “tell” the next command(s) about it.
This is no more, thanks to properties. They offer a generic mechanism to attach data to pipeline and layers. They are the backbone of several features introduced today, and lay the ground for future features within vpype or in plug-ins.
Layer color, pen width, and name
- Layer color, pen width, and name are now customizable (#359, #376, #389)
- The
readcommands now sets layer color, pen width, and name based on the input SVG if possible.- The new
color,penwdith, andnamecommands can be used to modify layer color, pen width, and name.- The new
penscommand can apply a predefined or custom scheme on multiple layers at once. Two common schemes are built-in:rgbandcmyk. Custom schemes can be defined in the configuration file.- The
showandwritecommands now take into account these layer properties.
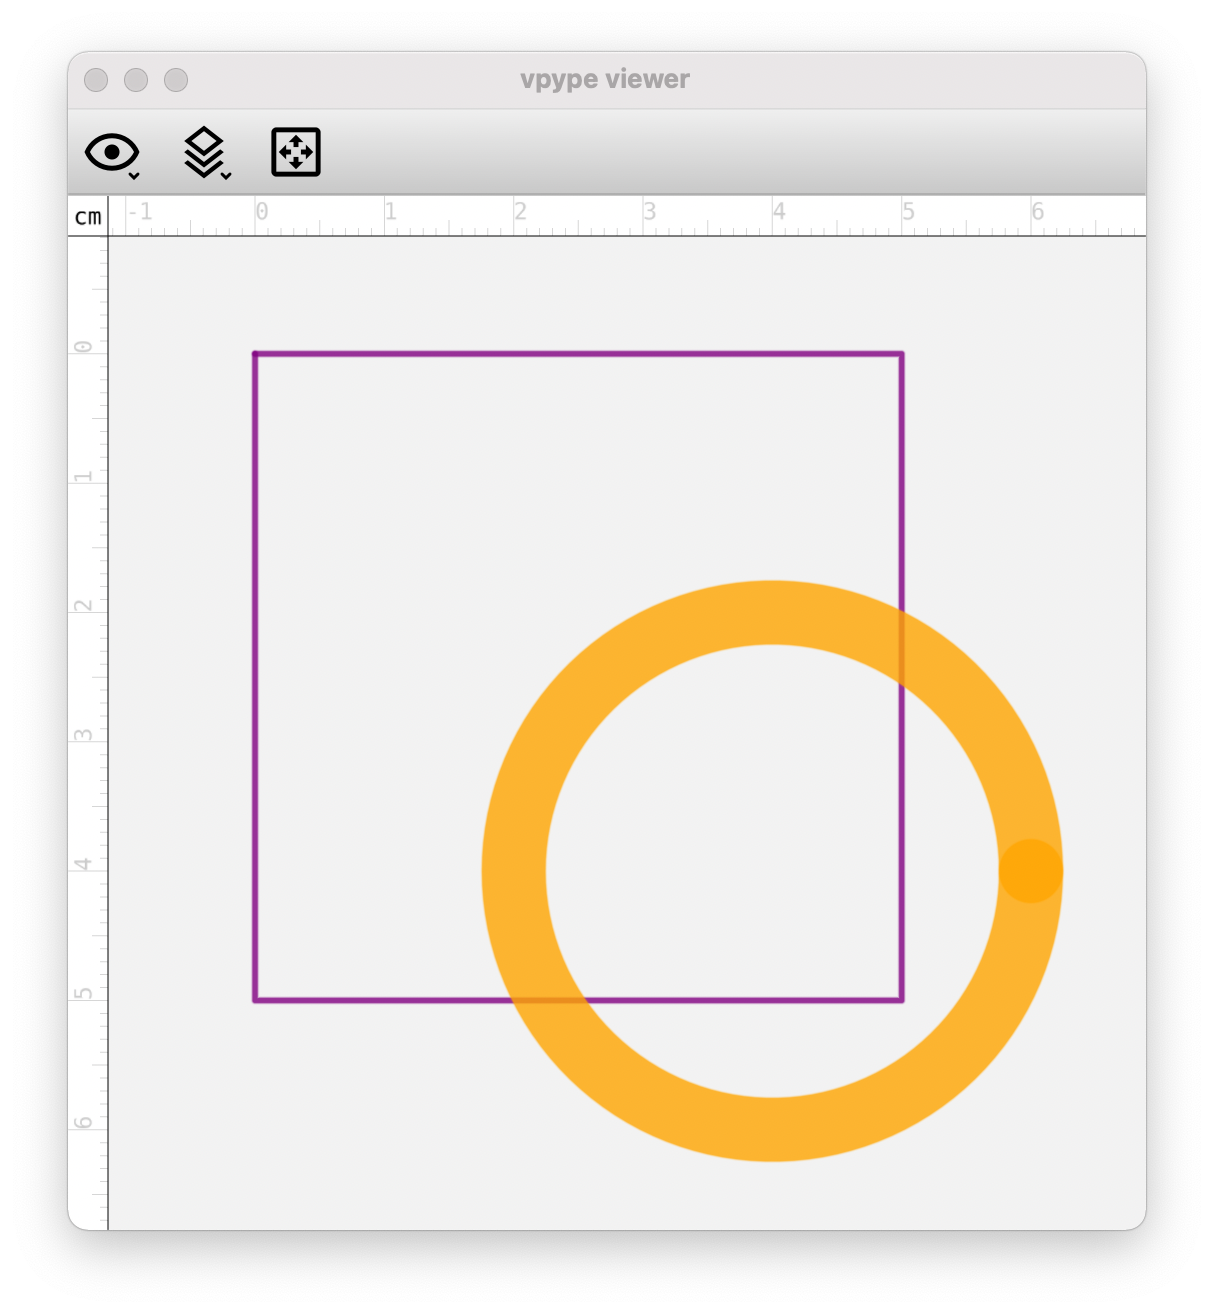
Supporting arbitrary layer colors, pen widths, and names, has long been amongst the most requested features. Well, thanks to properties, here they are. It happens automagically when using read, and the new commands can further customise these values:
$ vpype \
    rect --layer 1 0 0 5cm 5cm \
    color --layer 1 purple \
    penwidth --layer 1 0.5mm \
    circle --layer 2 4cm 4cm 2cm \
    color --layer 2 orange \
    penwidth --layer 2 5mm \
    show
The new, high-level color, penwidth, and name commands are simple wrappers which change the value of specific system properties (i.e. vp_color, vp_pen_width, resp. vp_name):
$ vpype random name "hello" color purple penwidth 0.1mm proplist --layer 1
listing 3 properties for layer 1
  vp_color: (color) #800080
  vp_name: (str) hello
  vp_pen_width: (float) 0.37795275590551186
System properties differ from “regular” properties only in the sense that they have special meaning to vpype. By convention, their name is prefixed with vp_.
Special mention for the new pens command, which is short for here is the set of pens I intend to use for this plot. It sets in bulk layer colors, pen widths and/or names all at once, based on a built-in or custom configuration. For example, this produces a CMYK SVG using the flow imager plug-in:
$ vpype \
    flow_img [...] --cmyk input.jpg \
    pens cmyk \
    write output.svg
Introduced new commands for low-level inspection and modification of properties (#359)
propget: gets the value of a given global or layer propertyproplist: lists all global and/or layer properties and their valuepropset: sets the value of a given global or layer propertypropdel: deletes a given global or layer propertypropclear: removes all global and/or layer properties
These are low-level commands to interact with properties. Although they have limited use in real-world workflows, they come in handy when learning about properties or crafting complex pipelines.
Updated layer operation commands to handle properties (#359)
- When a single source layer is specified and
--probis not used, thelcopyandlmovecommands now copy the source layer’s properties to the destination layer (possibly overwriting existing properties).- When
--probis not used, thelswapcommand now swaps the layer properties as well.- These behaviors can be disabled with the
--no-propoption.
With properties, some of the layer manipulation commands became somewhat ambiguous. For example, what happens with properties when using lmove all 1 (merges all layers into layer one) or move --prob 0.5 1 2 (picks geometries from layer 1 with a 50% probability and moves them to layer 2)?
I opted for a strategy where layer properties are affected only for unambiguous cases. This is basically when a single layer is moved/copied and when probabilistic behaviour is not used at all. In all other cases, the layer properties are left unchanged.
From SVG attributes to properties
Added the
--attroption to thereadcommand to (optionally) sort geometries by attributes (e.g. stroke color, stroke width, etc.) instead of by SVG layer (#378, #389)The
readandwritecommands now preserve a sub-set of SVG attributes (experimental) (#359, #389)The
readcommand identifies SVG attributes (e.g.stroke-dasharray) which are common in all geometries within each layer. These attributes are saved as layer properties with their name prefixed withsvg_(e.g.svg_stroke-dasharray). Thewritecommand can optionally restore these attributes in the output SVG using the--restore-attribsoption.
As noted, the read command now tries to extract SVG attributes and store them as layer properties. There are two motivations for that. First, it enables the write command to optionally restore these attributes in the output file, in order to achieve a higher degree of fidelity. (This feature is experimental and opt-in for the time being.) Second, it enables future features or plug-ins to do neat things such as generating hatch fills when fill is set to a color, or cutting paths in bits to emulate stroke-dasharray if defined.
Now, since properties are only available at the layer level (or globally), read discards SVG attributes that are not shared amongst every paths within a given layer. Let’s take an example:
<svg xmlns="http://www.w3.org/2000/svg" width="650" height="650">
    <circle cx="150" cy="150" r="100" stroke="red" stroke-width="0.5mm" fill="green" />
    <rect x="400" y="200" width="200" height="400" stroke="blue" stroke-width="0.5mm" fill="green" />
    <path d="M250,600 l-200,0 l0,-200 z" stroke="blue" stroke-width="0.1mm" fill="green" />
</svg>
This SVG only contains top-level elements, which vpype loads in layer 1 by default. The fill property is common to all paths and thus stored as a layer property, but the stroke and stroke-width attributes are heterogeneous and thus discarded. As a result, the show command uses the default color and pen width.
$ vpype read example.svg proplist --layer 1 show
listing 1 properties for layer 1
  svg_fill: (str) green

To address this issue, the read command has now the option to create layers based on SVG attributes instead of structure:
$ vpype read --attr stroke --attr stroke-width example.svg proplist --layer all show
listing 5 properties for layer 1
  svg_fill: (str) green
  svg_stroke: (str) red
  svg_stroke-width: (str) 0.5mm
  vp_color: (color) #ff0000
  vp_pen_width: (float) 1.8897648
listing 5 properties for layer 2
  svg_fill: (str) green
  svg_stroke: (str) blue
  svg_stroke-width: (str) 0.5mm
  vp_color: (color) #0000ff
  vp_pen_width: (float) 1.8897648
listing 5 properties for layer 3
  svg_fill: (str) green
  svg_stroke: (str) blue
  svg_stroke-width: (str) 0.1mm
  vp_color: (color) #0000ff
  vp_pen_width: (float) 0.37795296000000006
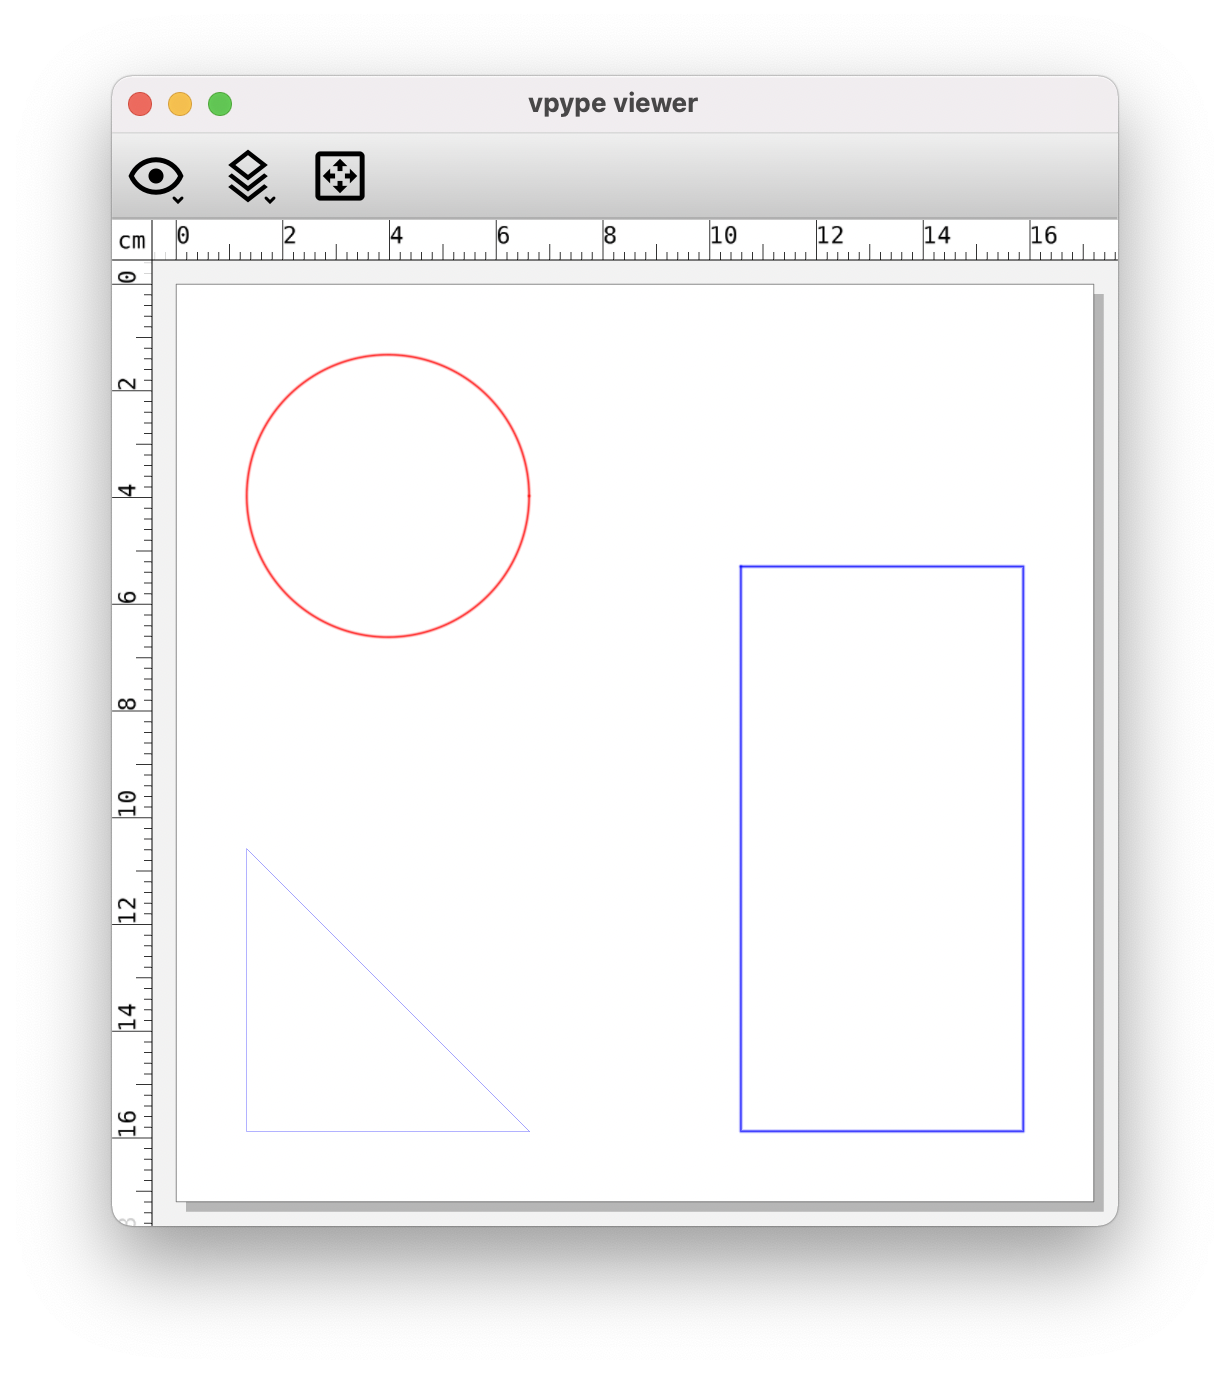
In this case, read creates one layer per unique combination of stroke and stroke-width attribute, resulting in a total of three layers, each assigned with the correct properties, and correctly displayed by show.
Source files
- The
readcommand now records the source SVG paths in thevp_sourceandvp_sourcessystem properties (see the documentation) (#397, #406, #408)
The idea of the vp_source and vp_sources properties is to keep track of the files from which the content of the pipeline originates from. The vp_source property is a single path, which is overwritten by the last command importing from a file. The vp_sources property is a set of all source files encountered so far. Both properties are pathlib.Path instances.
This is, for example, what happens when using read twice:
$ vpype read machine_typography_01_3.svg read machine_typography_02_3.svg proplist -g
listing 5 global properties
  svg_fill: (str) black
  svg_stroke: (str) none
  vp_page_size: (tuple) (396.850608, 559.3703808000001)
  vp_source: (PosixPath) /private/tmp/MT/machine_typography_02_3.svg
  vp_sources: (set) {PosixPath('/private/tmp/MT/machine_typography_01_3.svg'), PosixPath('/private/tmp/MT/machine_typography_02_3.svg')}
Here, vp_source points to the file read by the last read command, but vp_sources contains all two source files.
Currently, read is the only command which sets these variables, but the idea is that any command involved with reading a file (SVG or otherwise) should set these properties, including plug-ins such as hatched, flow imager, or vpype-embroidery.
One of the most common use case is to name the output file after the input file:
$ vpype flow_img [...] my_image.png write "{vp_name.stem}_converted.svg"
Note the use of a property substitution pattern, which brings us to the next topic.
Property substitution
Added property substitution to CLI user input (#395)
The input provided to most commands' arguments and options may now contain substitution patterns which will be replaced by the corresponding property value. Property substitution patterns are marked with curly braces (e.g.
{property_name}) and support the same formatting capabilities as the Python’sformat()function.
This is where things start becoming “meta”! 🤯
As shown in the previous example, the value of a property may now be used anywhere as input using property substitution patterns.
Here is another example where the full path of the input file is drawn and displayed:
$ vpype read example.svg text -p 0.5cm 0.5cm "{vp_source}" show
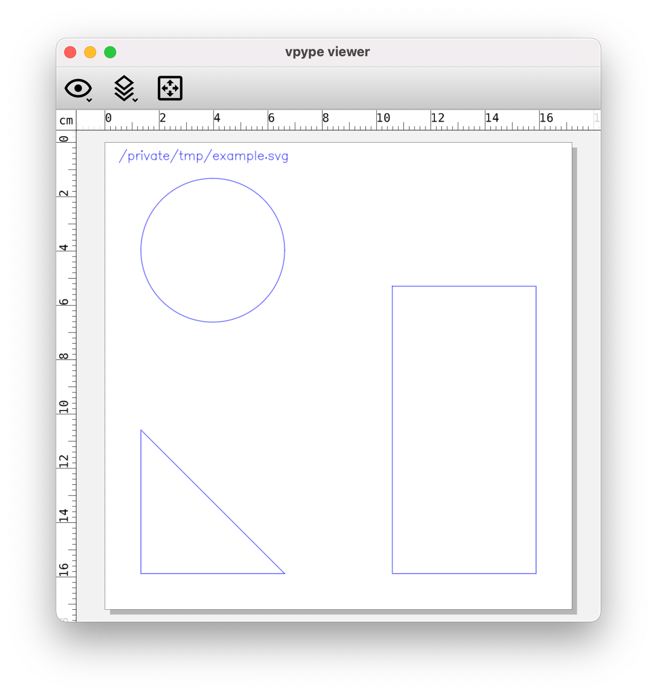
Again, vp_source is a pathlib.Path instance, so {vp_source.name} (file name) or {vp_source.stem} (file name without extension) could be used instead.
Multiple substitution patterns can be combined and mixed with regular text. For example, this creates an output file in the same directory as, and named after, the input file:
$ vpype read example.svg linesort \
    write "{vp_source.parent}/{vp_source.stem}_optimised.svg"
Of course, when using vpype interactively, it’s easier to simply spell out the output file name. Instead, this kind of mechanism makes it considerably easier to write generic, reusable shell scripts.
Note that, since property substitution internally relies on Python’s str.format() function, the number formatting mini-language is available as well (e.g. {vp_pen_width:.02f}). See the documentation for some examples.
Now, taking a step back, this feature is neat indeed, but its usefulness turns out to be limited in many non-trivial, real-world scenarios. I had hoped it would unlock several workflows I had in mind, but it just did not - or not elegantly enough. So much so that I even considered dropping the feature altogether.
This was a bit frustrating, to say the least. And ultimately lead to what is the next big chapter of this release.
Expressions
Added expression substitution to CLI user input (#397)
The input provided to most command’s arguments and options may now contain expression patterns which are evaluated before the command is executed. Expression patterns are marked with the percent symbol
%(e.g.%3+4%) and support a large subset of the Python language. A lot of examples were added in the cookbook.
This is possibly the most transformative feature brought to vpype since its inception: anything between pairs of % characters is now evaluated as (a sub-set of) Python code, and the result is substituted in the input before it reaches the actual command. The documentation has been updated with a whole new section about expressions (which I’m not going to repeat here), and the cookbook has plenty of examples making use of them. Do check them out for a taste of what expressions are capable of!
This feature blurs the lines between a mere CLI tool and a programming language. This begs the question of why not using a programming language in the first place, a point raised by fellow Python dev and flow imager author Jonas Serych. vpype even offers a proper API for that!
Here are my thoughts about this:
- Users of vpype are often not Python developers – or developers at all. Expressions build on existing vpype knowledge and bring, at least through examples and recipes that can be copy/pasted/customized, tiny bits of programs which are readily useful, without the need to learn much of the Python syntax and ecosystem.
- For many real-world cases (see the examples linked in the release notes), the resulting one-liners are more compact than the equivalent in proper code - even Python, even with vpype API. (Arbitrarily complex pipelines can of course be conceivably crafted as counter-examples, but this is besides the point.)
- Added the
evalcommand as placeholder for executing expressions (#397)
Though expressions can be used in any command’s input, some “space” dedicated to them in the pipeline can be useful. Typical cases include variable initialization or querying the user for some parameter with the input() function. Several examples shown or linked below make use of this.
Block processors
Improved block processors (#395, #397)
- Simplified and improved the infrastructure underlying block processors for better extensibility.
- The
beginmarker is now optional and implied whenever a block processor command is encountered. Note: theendmarker must always be used to mark the end of a block.- Commands inside the block now have access to the current layer structure and its metadata.
Block processors hardly got any love since the first release of vpype and, as far as I can tell, weren’t used much - if at all - due to their limitations. Properties and expressions completely reverse this situation and block processors are now where the magic happens. The changes above lay the ground work for this.
Improved the
gridblock processor (#397)
- The page size is now updated according to the grid size.
- The command now sets expression variables for use in the nested pipeline.
- Cells are now first iterated along rows instead of columns.
The
repeatblock processor now sets expression variables for use in the nested pipeline (#397)Added
forfileblock processor to iterate over a list of file (#397)Added
forlayerblock processor to iterate over the existing layers (#397)The
readcommand now will ignore a missing file if--no-failparameter is used (#397)Changed the initial default target layer to 1 (#395)
Previously, the first generator command of the pipeline would default to create a new layer if the
--layeroption was not provided. This could lead to unexpected behaviour in several situation. The target layer is now layer 1. For subsequent generators, the existing behaviour of using the previous generator target layer as default remains.
That’s two new block processor commands, and another two finally coming to life, plus a few changes to make them work better with real-world workflows.
One of the key changes is that block processors now set temporary expression variables (prefixed with _) that can be used in the nested pipeline. They are listed in each command’s help text:
$ vpype grid --help
Usage: vpype grid [OPTIONS] NX NY

  Creates a NX by NY grid of geometry

  [...]

  The following variables are set by `grid` and available for expressions:

      _nx: number of columns (NX)
      _ny: number of rows (NY)
      _n: total number of cells (NX*NY)
      _x: current column (0 to NX-1)
      _y: current row (0 to NY-1)
      _i: current cell (0 to _n-1)

  [...]
Another novelty is the introduction of two new block processor commands:
- The
forfilecommand accepts a pathname pattern (e.g.*.svg) and executes the nested pipeline for each of the paths it expends into. It makes things like batch processing files, merging multiple SVGs into a multilayer file, or laying out multiple files on a grid a breeze. - The
forlayercommand executes the nested pipeline for each of the exising layers, which is useful, e.g., to export one file per layer.
Checks the related documentation for more details.
This example, taken from the grid layout recipe, demonstrates best what vpype 1.9 is about:
$ vpype \
   eval "files=glob('*.svg')" \
   eval "cols=6; rows=ceil(len(files)/cols)" \
   eval "names={};n=100" \
   grid -o 10cm 15cm "%cols%" "%rows%" \
       read --no-fail "%files[_i] if _i < len(files) else ''%" \
       layout -m 0.5cm 10x15cm \
       forlayer \
           eval "%if _name not in names: names[_name] = n; n = n+1%" \
           lmove %_lid% "%names[_name]%" \
       end \
   end \
   write combined.svg
It creates a grid layout from multiple SVG files, combining layers using their name (e.g. all “yellow” layers in input files are merged in a single “yellow” layer in the output file). Check the recipe for a detailed explanation.
This pipeline has it all:
- extensive use of expressions,
- two nested blocks, using their expression variables (prefixed with
_), - use of properties (via the
_namevariable set byforlayer, which contains the current layer’svp_nameproperty).
Here is how it looks when run on my Machine Typography #ptpx project:

Other changes
Note: This is the last version of vpype to support Python 3.7.
It’s the year of the walrus for vpype! 🦭
- Added
pagerotatecommand, to rotate the page layout (including geometries) by 90 degrees (#404)
This command is useful for plotters without native support for both portrait and landscape orientations. Your plotter support only, say, landscape orientation and you want to plot a portrait-oriented file? This pipeline does the trick:
$ vpype read portrait_input.svg pagerotate wrote landscape_output.svg
- Added
--keepoption to theldeletecommand (to delete all layers but those specified) (#383)
There was formerly no way to delete all layers but one. The new --keep option fills this gap.
- Pinned poetry-core to 1.0.8 to enable editable installs (#410)
Poetry finally supports editable installs thanks to PEP 660 🎉
This change is relevant when developing jointly on vpype and another project that depends on it (e.g. vsketch, or some plug-in). In such cases, vpype can now be installed in editable mode from a local checkout. Modifications made to it will immediately be available to the dependent project:
$ cd my-plugin
$ source venv/bin/activate
$ git clone https://github.com/abey79/vpype ../vpype
$ pip install -e ../vpype
- Fixed an issue with the
randomcommand when using non-square area (#395)
That’s a two-year-old bug I can’t believe I hadn’t seen before 🙄 (I use random a lot when testing out stuff during development.)
- Renamed the bundled config file to
vpype_config.toml(#359)
This is the config file bundled with vpype. It used to be called hpgl_devices.toml, but now it also contains the build-in configurations of the new pens command (cmyk and rgb). The old name didn’t make sense anymore.
API changes:
- Moved all CLI-related APIs from
vpypetovpype_cli(#388)- Updated the block processor API (breaking change) (#395)
- …
This release comes with scores of changes at the API level (to many to list here). Two of these changes deserve a note though.
First, a fair amount of infrastructure used by the vpype CLI (e.g. the @generator decorator and friends) used to reside in the vpype package instead of vpype_cli. This is not ideal for many reasons and I’m moving away from it. vpype should be a “pure” library, whereas vpype_cli should contain everything needed for its CLI (and for plug-ins). These are not yet breaking changes but will generate deprecation warnings with most plug-ins. I will ensure that they are fixed ASAP.
Secondly, as part of the block processor overhaul, the @block_processor decorator had breaking changes without backward-compatible deprecation. I am not aware of any third-party code actually using it, so this shouldn’t cause any issue.
What’s next?
Congrats if you got this far! 😲🏆
I hope you’ll enjoy vpype 1.9 as much as I sweated preparing it. 😅
Feedback is welcome, via discussions for support/suggestions or issues for bugs. As always, I hang out on the drawingbots.net’s Discord server and am available for a chat.
Contributions are most welcome too, and the documentation is one area where help is always beneficial. I’ve gathered a few ideas of what can be done here.
To conclude, here are my probable areas of focus for the coming weeks/months:
- Given the scope of this release, I’m expecting to deal with increased user support and a few kirks and bugs to address. I’ll be available for this in the short term.
- Property-related stuff must be ported to vsketch, including a nice API to set layer name, color, pen-width, etc.
- The next big topic for vpype is its UX. At least, I want to improve the look and usability of the integrated help (using the brand new rich-click project), and add some visual feedback during execution.
- With support for Python 3.7 dropped, compatibility with Python 3.10 is now on the menu.
- Whatever user feedback might steer my attention to 😉